I haven't gifted the wife a Valentine's present in a few years, so will attempt a simple carving for her this year, a phoenix. A few years ago I took a great course on carving taught by Mary May at MASW. Since taking that course I receive an email from her school on occasion announcing online courses she teaches, which usually focus on a specific aspect of carving. Many of Mary's online courses look intriguing, so I plan to explore them and give one a try.
A recent email looked simple enough for me to tackle without a course. The phoenix looked significantly easier than any of the shells carved in the class I took. The email included a picture of a carved phoenix, a perfect Valentine's gift.
After locating a piece of walnut that looked interesting, the wood was sanded to 180 grit with the oscillating sander. The photo of the carved phoenix was printed in black and white and the print was taped to two adjacent sides of the walnut. A sheet of carbon paper was slipped under the printed phoenix. The design was copied to the walnut with a sharp pencil. Each cut had both edges copied to indicate the width of cut.
The carbon paper and printout were removed. The board was clamped in the Sjöberg vise. Nothing was square about this scrap of walnut, so wedges were employed when clamping. The design was cut with a #6 chisel, not the recommended #4 as I don't own a #4. The walnut is pretty easy to carve, somewhat of a surprise as I have only carved basswood, which is quite soft and grain free.


The Sjöberg vise is still problematic. The front drops down slightly, causing clamped objects to pop up out of the clamp. The holes through which the vise shafts pass are too large and need a bearing added. Maybe I will tackle Sjöberg vise repairs after completing this carving. I would use this vise more, if it clamped more effectively.
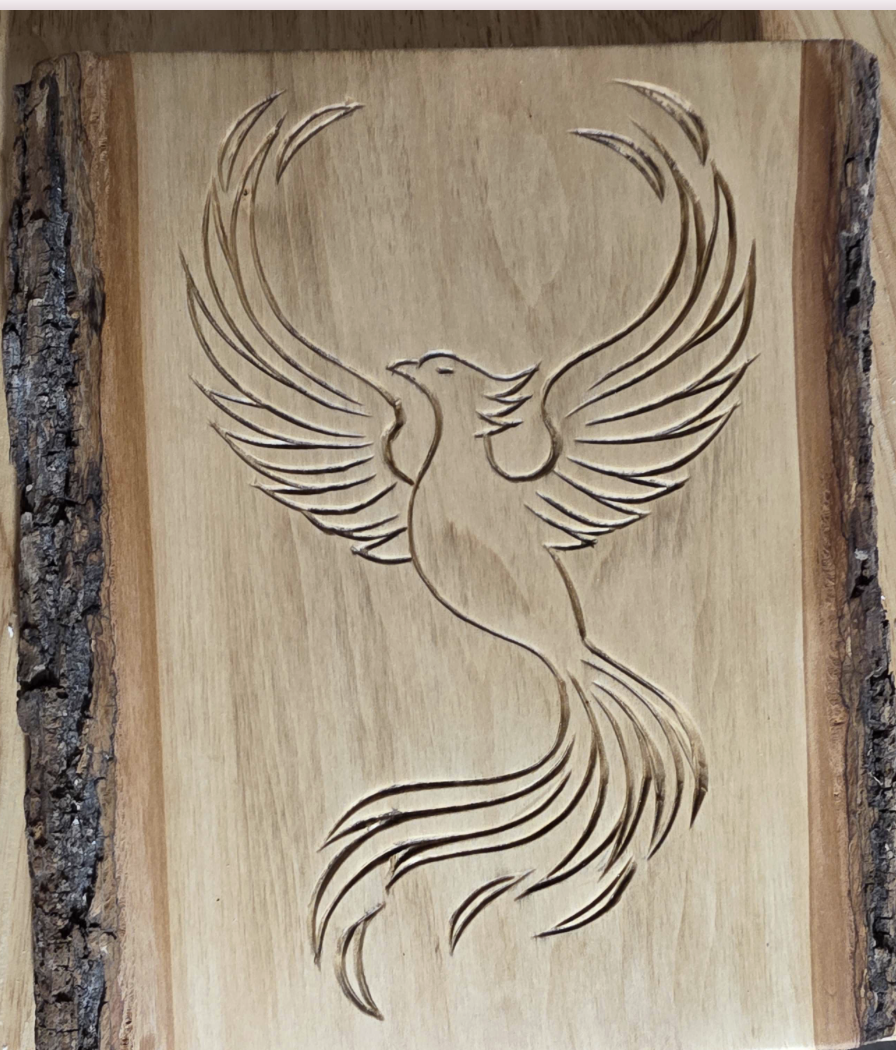
The carving was completed in less than two hours, a very relaxing two hours. Only a bit of clean-up was needed to smooth out some cuts. A few remaining rough areas were burnished with a pointed bamboo dowel. The photo below shows the complete carving.

The wood was given a final sanding with 220 grit sandpaper. The back was also sanded with 220 grit prior to carving the dedication. This dedication was sketched and transfered to the walnut as seen below.

The letters and hearts were quickly carved using the same #6 chisel.

Happy Friday, the 13th !!
The carved lines do not stand out sufficiently for my taste, so some experiments are in order. I found little on the internet to help me highlight the carved lines, except for a too late note to apply sealer to the wood prior to carving and stain after. A similar looking scrap of walnut was located and sanded with 220 grit sandpaper. A few lines were carved into the scrap: with the grain, across the grain, and at a 45° angle to the grain. "Gunstock" stain was applied across the grain and after fifteen seconds wiped with the grain, leaving some liquid stain still in the cuts. The quick removal of excess stain was to ensure a uniform coverage, but also so that little stain penetrated the wood. Surface sanding is used next to lighten the surface, at least that is the plan.
The three photos below show the test strip of walnut successively stained, sanded, and the cuts wiped out. Compressed air was insufficient to remove the sanding dust from the cuts, wo they were wiped out with the edge of a paper towel. The cuts were probably not yet dried enough leading to the necessity of wiping. I like the look and will use the same procedure on the plaque.


The front, back and sides of the plaque were treated with the same stain, wiping on a lot and wiping off the excess within less than a minute.

After three hours the phoenix was sanded. The sanding dust filled the cuts as before. Each of the cuts was cleaned out with a shop towel backed by a fingernail. This did a good job and can be seen by comparing the before and after photos below. The back side will be sanded tomorrow, hopefully avoiding the clean out process.


The next day another sanding was followed by once again cleaning out the cuts. The back was treated similarly. All sides of the board were painted with shellac. After two coats the piece was considered done. The shellac further darkened the carving lines, not bad.

The bright spots from the overhead lights make photography of shiny objects difficult. What is needed is some way to soften the lights, somehow holding a translucent sheet under the light fixture. Tough to hold something in one hand and use the phone's camera with the other. Maybe a hat with an extension for holding tracing paper?!?